Sharing our passion for the Jeep life!
Suspension
For the suspension, I decided to keep it old school. Simplicity is a good thing in the backcountry. I retained the OEM spring-under-axle configuration of the original Jeep CJ. Even though it's the original configuration, the system I chose should be a significant upgrade in both strength and flexibility.
Leaf spring technology has come a long way since 1970, from the materials to the design to the anti-friction pads between the springs. The original spring packs were thick, stiff, and unforgiving. I had read a lot of positive reviews about BDS Suspension, and after researching the company and its products, I decided to order a 2.5" Suspension Lift Kit for 1969-71 CJs with Glide-Ride spring packs.
These spring packs feature tapered leafs, anti-friction pads, bolt style leaf alignment clamps, and a full military wrap to protect your spring eyes from the rocks. If you actually break the main leaf (unlikely), the military wrap will allow you to limp home off the trail. And all of BDS' lift systems are covered by a "No BS" lifetime warranty.
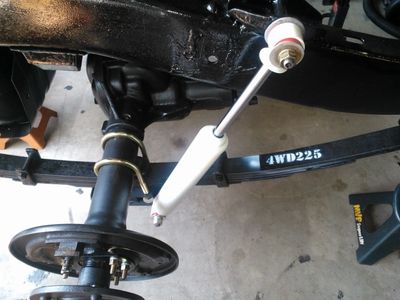
In addition, the kit came with new u-bolts and hardware and four correct length hydraulic shocks valved specifically for the spring rate of the spring packs. I also purchased u-bolt skidplates from Performance Accessories. These are heavy plate steel, and they protect the the u-bolt ends from deformation from dragging over rocks or ledges.
The original spring mounts were riveted and welded to the frame. However, the mounts were extremely worn - several of the shackle outer bolt sleeves had broken loose and had hogged out the holes in the hangers from years of rattling around. Many of the bolts were also permanently "welded" to the inner sleeves, which had deteriorated from rust and corrosion. I ended up carefully cutting each of the spring mounts from the frame and grinding down the original rivets until I could heat them up and pop them loose. I purchased new spring hangers, bolted them on using grade 8 hardware through the rivet holes, and then welded them to the frame.
I also purchased four heavy-duty shackles with polyurethane bushings and greasable bolts to replace the original stamped steel units. While removing the passenger rear shock, I found that the threads on the shock mount were stripped and deformed, so I broke out the tap and die set and cut new threads.
Finally, I found that the original rubber bump stops were worn, so I removed them from the frame and replaced them with a set of polyurethane bump stops. These are approximately 1.5" thicker than the OEM stops, and should allow more flex from the 2.5" lift springs while still protecting from over compression of the spring packs.
